Friday, December 28, 2018

New Year’s “Beans and Belly” – Good Luck with This!

I wanted to sneak in this pork belly on black-eyed peas salad video before the New Year, to help ensure you a very lucky, and prosperous 2019. Of course, there’s no guarantee this roast pork belly on black-eyed peas salad recipe will bring you good fortune in the New Year, but what if it does? 

Either way, this is still one of the most delicious ways to enjoy both pork belly and black-eyed peas, and could not have been happier with how this came out. Since I’m still officially on vacation I’ll keep this post brief, but I did want to mention the bean soaking seen herein.

There are many articles online about this being an unnecessary step, and technically it is, but it’s been my experience that if you soak your beans the night before, they seem to hold their shape better, as well as cook a lot faster. So I say soak, but either way, I want to wish you all a very Happy New Year, and I really hope you start 2019 off with a big bowl of “beans and belly.” Enjoy!


Ingredients for 6 portions:
For the Pork Belly:
2 pound pork belly (skin removed)
1 tablespoon kosher salt, plus freshly ground black pepper and cayenne to taste
- Roast at 200 F. for 7 1/2 hours

For the Black Eyed Pea Salad:
1 cup dried black-eyed peas, soaked overnight, drained
2 quarts fresh water
1 tablespoon kosher salt
1 bay leaf
Dressing:
2 tablespoons Dijon mustard
1/3 cup seasoned rice wine vinegar
2 tablespoon white vinegar
1/3 cup mild olive oil or vegetable oil
1 minced garlic clove
1/3 cup finely diced red onion
2 jalapeno, finely chopped
1 red bell pepper, finely diced
salt, freshly ground black pepper, and cayenne to taste
2 tablespoons chopped fresh parsley leaves
-->

Tuesday, December 18, 2018

Chef John is on Christmas Break!

Michele and I would like to wish all of you a very Merry Christmas and Happy Holidays, as we get ready for a little winter break. One of the great perks of having corporate overlords, is that they require/encourage you to use up your vacation time, and thanks to my good friends at Meredith, and Allrecipes.com, that’s what I’ll be doing this week. 

However, after Christmas I will sneak in a video before New Year’s Day, which will feature a recipe guaranteed to bring you wealth and good fortune in 2019 (or your money back). So please stay tuned for that, and as always, enjoy!

Friday, December 14, 2018

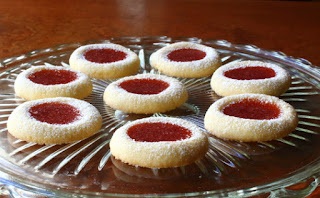
Thumbprint Cookies – Great Grandma Mitzi to the Rescue!

My mother, Pauline, made really nice thumbprint cookies, but unfortunately I never wrote down her recipe, and so I was forced to go online to find one, so I could refresh my memory. I knew the ingredients, but unless you have them in the right proportions, you won’t end up with that perfect melt-in-your-mouth texture these iconic cookies are known for.

Above and beyond the buttery mouthfeel, we also want a cookie that has perfectly smooth edges, with none of the dreaded cracks that give away a subpar recipe. So, I did an image search, and came across a recipe that looked very similar, and believe it or not, it was credited to a Great Grandma named “Mitzi.” Since my last name is Mitzewich, that pretty much sealed the deal.

I usually have to adapt recipes I steal online, but with these, I didn’t need to change a thing. They really were perfect, as advertised. So, sincere thanks to Stacy from Wicked Good Kitchen, and her Great Grandma, Mitzi.  My Mom would’ve loved these, although she would’ve asked where the chopped walnuts were, since she liked to add those to hers. 

Speaking of family, if you’re entertaining some of yours during the holidays, these beautiful cookies would make a lovely addition to your dessert table, which is why I really do hope you give them a try soon. Enjoy!


Ingredients to make 20 to 24 Thumbprint Cookies:
1 stick (1/2 cup) soft unsalted butter
1/3 cup powdered sugar (not sifted)
1 large egg yolk
1 teaspoon vanilla extract
1/8 teaspoon almond extract
1/4 teaspoon fine salt
1 1/4 cups all-purpose flour (5 ounces by weight)
1/2 cup fruit jam to fill centers

- 325 F. for 15 minutes

For the icing:
- Combine powdered sugar with a little milk or water, and mix until you have a consistency that will hold its shape when piped.
-->

Tuesday, December 11, 2018

Sicilian Christmas Pizza (Sfincione) – Finally, a Pizza with More Carbs

Topping a thick-crust pizza with breadcrumbs might sound like a strange idea, but it really is the secret sauce behind this Sicilian Christmas Pizza. Well, that and the actual secret sauce. Speaking of secrets, whether you tell your friends and family that the sauce is made with onions and anchovies is your business, but if you think that’ll turn them off, then maybe keep it to yourself, at least until they realize it’s one of the most delicious things they’ve ever had. Hey, all’s fair in love, war, and pizza.

Besides the crispy, cheesy, crumb topping, and super savory sauce, the other secret to this amazing pizza is the extremely wet and sticky dough. You could use a more standard pizza dough for this, but it won’t be the same experience. One reason we can get away with putting breadcrumbs on the top is the contrast between that texture, and the feather-light, spongy crust. Besides, if you use enough oil on your fingers, it’s really not that hard to work with anyway.

As usual, I’m not claiming any kind of authenticity here, so I don’t feel bad that I didn’t use casciocavallo, which is the traditional cheese for this pizza. I ended up using mozzarella, aged provolone, and pecorino, which I think work very well on this, but having said that, use whatever melty cheeses you like. The same goes for adding other toppings, but I can’t imagine anything making this any more amazing that it already is. Either way, whether it’s for Christmas, or another occasion, I really do hope you give this a try soon. Enjoy!


Ingredients for a 18" X 13" Sheet Pan:

For the dough:
2 cups warm water (105 to 110 F.)
1 package dry active yeast
1 1/2 teaspoons kosher salt
1 teaspoon sugar
3 tablespoons olive oil
4 1/3 cups all-purpose flour, or more as needed to achieve a very wet, sticky dough

For the sauce:
2 tablespoons olive oil
2 large yellow onions, diced
1 teaspoon red-pepper flakes
1 teaspoon freshly ground black pepper
1 tablespoon tomato paste
1 teaspoon dried oregano
9 oil-packed anchovy fillets
1 1/2 cups marinara or tomato sauce
1/4 cup water to rinse sauce container
salt to taste
Note: For best results, sauce should be highly seasoned

For the crumb topping:
3/4 cup fine plain dry bread crumbs
1 cup finely grated pecorino cheese
1 tablespoon anchovy oil
2 tablespoons olive oil

For the pizza:
3 ounces grated mozzarella
3 ounces aged provolone cheese

- Bake at 400 F. for about 35 minutes (go as long as you can without the crumbs on top burning, so that the crust cooks as much as possible)
-- For best results, slide cooked pizza on to a cooling rack to prevent the bottom from getting soggy. 
--- If bottom gets soggy, pizza slices can be reheated in a dry pan, which will crisp up the crust nicely.
-->

Tuesday, December 4, 2018

Kimchi Pancakes – Come for the Savory Pancake, Stay for the Dancing Fish Flakes

I remember getting a request for kimchi pancakes many years ago, and while I recall being intrigued, apparently not enough to actually research the recipe, and do a video for it. That all changed after seeing it on a local bar menu, where Michele and I enjoyed not one, but two orders of these incredibly tasty, and visually thrilling, savory pancakes.

I loved the taste and texture, but what really got my attention were the dancing bonito flakes on top. I’d never seen anything quite like that, and found it as mesmerizing, as I did delicious. As I mentioned in the video, those kimchi pancakes came with a little drizzle of spicy mayonnaise, which depending on how decadent of an experience you’re going for, isn’t a bad idea, especially if you plan on frying these up, and cutting them in wedges to serve as a snack at a party.

If you want a thicker, and more substantial kimchi pancake, you want to use less liquid, or more flour, so that your batter isn't quite as runny as mine. Personally, I enjoy this style a little more, since you end up with a thinner pancake that’s crispy around the edges, but still moist and tender inside. Having said that, you should definitely experiment with different textures to see what you like best.

These are also a perfect catchall for leftover meat and vegetables. Just chop it up, toss it in, and see what happens. Speaking of seeing what happens, if you want to watch fish flakes dance, you’ll have to find some bonito, which means finding an Asian market, or buying them online, and I highly recommend you do just that. Either way, I really do hope you give these a try soon. Enjoy!


Ingredients for 4 Appetizer Size Kimchi Pancakes:
1 1/2 cup chopped drained kimchi (12 ounce jar)
1 large egg
3 tablespoons kimchi juice
1/4 cup water
1 teaspoon brown sugar
1/2 teaspoon salt
1/2 teaspoon sesame oil
1/2 cup thinly sliced green onions
about 3/4 cup all purpose flour, or as needed
4 tablespoons bonito flakes for the top, optional
-->

Friday, November 30, 2018

Mini Buffalo Chicken Egg Rolls – No Wings Were Harmed in the Making of This Snack

These mini buffalo chicken egg rolls remind me of the time I ordered something called “boneless Buffalo wings,” many years ago. Like all Western New Yorkers, I have a deep affection for this messy, but delicious snack, and so I was very excited about being able to enjoy some without having to deal with the wing bones.

As I waited for my order, I felt sorry for whichever prep cook had been given the tedious task of de-boning them. However, my sympathy was unwarranted, since what they were calling “boneless buffalo wings” were nothing more than strips of fried chicken breast, coated in the same sauce. While happy for the prep cook, I was disappointed they weren’t wings.

So, it’s a little bit ironic that all these years later, I'm now using chicken breast to create a Buffalo wing alternative, but at least I’m not trying to trick anybody. That aside, these really do have a very similar flavor profile, and I should probably be more concerned with the people who are going to be upset I’m calling these egg rolls.

What’s not going to upset anybody is just how great a party snack these really do make, and not just because they’re delicious. Even sober people make a mess eating actual buffalo chicken wings, but that’s not going to be an issue here, thanks to their very user-friendly design. So, if you’re planning a party soon, I really do hope you give these a try. Enjoy!


Ingredients for 14 to 16 Mini Buffalo Chicken Egg Rolls:
8 ounces diced cooked chicken breast
1/3 cup diced celery
2 ounces blue cheese
2 ounces cream cheese
1 tablespoon Louisiana hot sauce
salt, freshly ground black pepper, and cayenne to taste
14 to 16 square wonton wrappers
more Louisiana hot sauce for dipping
-->

Tuesday, November 27, 2018

Lemon Gingersnap Posset – A Lemon Pudding to Die For

This lemon posset seems too good to be true. Not only does it feature a rich, thick, luxurious texture, and intense, clean citrus taste, but it’s also egg-free, starch-free, and gelatin-free. As if that wasn’t enough, it only takes three ingredients, and could not be easier to make. Notwithstanding its calorie count, this may be the perfect special occasion dessert.

Like I said in the video, I used lemon since my posset was being paired with gingersnap crumbs, but the first time I ever had this it was done with lime and graham cracker crumbs, and was equally stellar. Next time I think I’ll try it with both, since once you experience this magical mixture, there’s always going to be a next time.  

This reminds me a lot of lemon curd, especially with how perfectly it pairs with fresh seasonal fruit, but the lemon flavor is even more intense, despite actually using less juice. It’s also significantly faster and easier to make. So yes, this does seem too good to be true, and yet somehow it is, which is why I really do hope you give this lemon posset a try soon. Enjoy!


Makes 4 Portions of Lemon Gingersnap Posset:
2 cups heavy cream
2/3 cup white sugar
1 generous tablespoon grated lemon zest
1/4 cup freshly squeezed lemon juice
1/2 cup crushed gingersnaps, or other crunchy cookie
4 or 5 teaspoons melted butter, or enough to moisten crumbs
whipped cream and seasonal fruit to garnish
-->

Tuesday, November 20, 2018

Leftover Turkey Tamale Pie – Sorry, Pumpkin, There’s a New Thanksgiving Pie in Town

Even if your turkey is perfectly cooked, the reheated leftovers can be a little dry and uninteresting, especially since the gravy always runs out before all the meat is gone. 

That’s why soup is such a popular choice for using up the last remnants of your bird, but this tamale pie will serve the same purpose, only in a significantly more exciting, and flavorful way.

There are two basic types of tamale pie. One features a cornbread topping, which is like eating chili with cornbread, and the other a traditional masa dough, which is like eating chili with polenta on it. Here, I wanted to create something that gives us the best of both, and I was very happy with how this came out.

While I’m branding this as a post-Thanksgiving leftover turkey recipe, it’s really a “how to make tamale pie” video, since you can sub in virtually any other meat and/or vegetable, and it should work just as well. In fact, I’m actually thinking of doing a version using cubed butternut squash as a turkey-adjacent side dish. Regardless of what you use, I really do hope you give this easy and delicious tamale pie a try soon. Enjoy!


Ingredients for 6 Portions Turkey Tamale Pie:
(I used a 9" X 12" baking dish)
1 tablespoon olive oil
1 large onion, diced
1 teaspoon salt plus more to taste
1 red bell, diced
2 poblano peppers, diced
1 teaspoon freshly ground black pepper
2 teaspoons cumin
1 teaspoon dried oregano
1 can (7-oz) chipotle peppers in adobo sauce
3 to 4 cups diced cooked turkey or chicken
4 ounces grated sharp cheddar cheese (about 1 packed cup)
1 jar (15.5-oz) red enchilada sauce
1 1/2 cups chicken broth

For the crust:
1 1/4 cups cornmeal
3/4 cup self-rising flour*
2 tablespoons white sugar
1 teaspoon kosher salt
2 large eggs
1 1/2 cups milk
4 ounces grated sharp cheddar cheese for the top

- Bake at 375 F. for about 45 minutes, or until the topping is browned and a toothpick comes out clean.

* If you don’t have self-rising flour, you can use 3/4 cup all-purpose flour sifted with 1 teaspoon baking powder and 1/2 teaspoon fine table salt.
-->

Friday, November 9, 2018

Loaded Twice-Baked Sweet Potatoes – A Savory Delete of the Sometimes Too Sweet

They say your greatest strength is also your biggest weakness, which certainly is true when it comes to sweet potatoes.  The starchy sweetness that makes this tuber such a popular holiday side dish, is also its fatal flaw, since, for me at least, it quickly leads to palate fatigue. After a few bites of mashed sweet potatoes, or sweet potato casserole, I’m pretty much over the experience, and I’m reaching for the cranberry sauce to reset my tongue, but here we’ve mixed in a few ingredients specifically selected to cut that sweetness, and push this much closer to the savory side of town.

Lime, jalapeño, and sharp cheddar may seem like odd choices here, but paired with the green onions, and bacon, they work wonders, and I had no problem finishing a whole sweet potato. And by whole, I mean two. By the way, these orange-fleshed sweet potatoes are often sold as “yams,” but they’re not, in case that ever comes up in conversation.

Besides all the obvious reasons, this is a great choice for your Thanksgiving table, since you can prep it ahead of time, and then bake them when you’re ready to serve.  They will also stay hot for quite a while, which is another reason they’re nice around the holidays, when oven space can be limited. So, whether you make these for a special occasion, or some completely un-special weeknight meal, I really do hope you get give these loaded, twice-baked sweet potatoes a try soon. Enjoy


Ingredients for 4 portions:
4 orange-fleshed sweet potatoes, scrubbed clean
8 ounces bacon, sliced
1/3 cup sliced green onions
1/4 cup diced jalapeno
1/2 cup grated sharp white cheddar cheese, plus a little bit for the top
2 tablespoons crème fraiche, or sour cream
2 teaspoons fresh lime juice
salt, freshly ground black pepper, and cayenne to taste
-->

Tuesday, November 6, 2018

Spicy Salami Spread (Nduja) – Almost Instant Soft Serve Salami

I’m not saying this spicy salami spread is as good as traditional nduja, but I am saying this takes about 3 months less time to make, and still delivers most of the characteristics that make this Calabrian delicacy so amazing. And just in case you’re not familiar with nduja, a few of those characteristics are a rich, spicy, super-savory flavor, and soft, luxurious texture.

Finding some decent salami to use should be simple enough, but depending on where you live, the oil-packed Calabrian chilies may not be as easy to acquire. Any decent Italian market will carry them, so ask your Calabrian friends where they shop, but if that doesn’t work, you can find them online as well. Or, you could use another spicy, jarred pepper product like Sambal, or simply use fresh hot chilies like Fresno, or cherry peppers. If it’s spicy, and it’s a pepper, it will work.

You can substitute bacon for the pancetta, but since bacon is smoked, your final product will taste significantly different. Not bad, just different. In any event, the wonderful ways you can use this are extensive. I gave a few ideas in the video, but other highly recommended uses include adding it to pasta sauces, salad dressings, ravioli fillings, and even as a pizza topping.

Having said that, this stuff is so unique, and delicious, your guests might not leave you with much to experiment with, which is fine, since this is so fast and easy to produce. So, with peak entertaining season right in front of us, I really do hope you give this a try soon. Enjoy!


Ingredients for about 2 cups Spicy Salami Spread (Nduja):
4 ounces sliced or diced pancetta, cooked, fat reserved
1/3 cup seeded hot Calabrian peppers
3 tablespoons Calabrian pepper oil from the jar
12 ounces sliced salami
1/4 cup room temp butter
2 or 3 tablespoons olive oil, or as needed to adjust the texture to your liking
-->

Friday, November 2, 2018

Portuguese Custard Tarts – The Hieronymites Got This Right

I’ve made custard tarts before, but never the world-famous Portuguese custard tarts, and I’m thrilled to report the results were shockingly good. This really was one of the best pastries I’ve ever enjoyed, custard or otherwise. 

Which is a good thing, since they do require a bit of effort to produce. The recipe itself is simple, using just a few basic ingredients, but there are numerous steps, and a certain amount of finesse is required, but the results are so worth it. After watching a few dozen videos on the technique, I decided to try the short cut version first, which uses frozen store-bought puff pastry. The results were not good. Since puff pastry is leavened with yeast, and contains so many more layers of butter and dough, my crust turned out too thick, and gummy, and wasn’t nearly as thin and crispy as it should’ve been. It may have been my technique, but officially I’m blaming the dough.

So then I attempted an “authentic” dough recipe from scratch, which was infinitely better. It’s a little tricky to work with, since the dough is very sticky, but I think that’s one of the keys here. Seems like the extra moisture in the dough, which is activated by the very hot oven, is what creates the signature flaky, crispy texture.

As far as the custard goes, it’s a relatively simple procedure, and we even streamlined one of the steps. You’ll have to decide whether you’re going to include lemon, cinnamon, and vanilla, which are apparently considered optional ingredients in Portugal, but I really enjoy the flavor, and wouldn’t change a thing. Regardless of what you decide to add, or not add to yours, like I said in the video, these should be on everyone’s baking bucket list. So, I really do hope you give them a try soon. Enjoy!


For the dough:
1 cup all-purpose flour
1/4 teaspoon kosher salt
1/3 cup cold water
Note: adjust with more flour or water to achieve what’s shown in the video
1 stick (4 ounces) very soft, high-quality unsalted butter

For the sugar syrup:
3/4 cup white sugar
1/4 cup plus 1 tablespoon water
1 cinnamon stick (or 1/4 teaspoon ground)
zest from 1 lemon

For the custard base:
1/3 cup all-purpose flour
1/4 teaspoon kosher salt
1 1/2 cups milk
6 large egg yolks
1 teaspoon vanilla extract

- Bake tarts at 550 F. for 12 minutes or until the pastry is browned and bubbly, and the tops start to blister and caramelize.
-->

Tuesday, October 30, 2018

Crispy Garlic Breadcrumb Chicken – No Fry, Not Dry, Must Try

Trying to convert a fried recipe into a baked one is usually a disappointing exercise in futility, but this crispy garlic breadcrumb chicken turned out to be a very enjoyable exception. 

While not exactly the same as a pan-fried, breaded cutlet, if you want to eat tender, flavorful chicken with lots of crispy, crunchy bits, then this significantly less-messy method is for you.

One of the keys to this technique is to use panko breadcrumbs, which are much larger, and more jagged than regular, fine breadcrumbs. If you can’t find them, you can easily make you own. Just pulse chunks of stale white bread in a food processor until coarsely ground, and then spread out on a baking sheet, and place in a 275 F. oven until they are dried and crispy.

Above and beyond being easier, this method also allows us to introduce some additional flavor, and moisture, thanks to the “glue” we use to attach the crumbs. I went very simple with my formula, but as I mention in the video, you can add all sorts of herbs and spices to yours. Either way, the next time you want crispy, breaded chicken with less mess, and more flavor, I really do hope you give this a try. Enjoy!


Ingredients for 2 portions:
2 large boneless, skinless chicken breasts (about 8-10 ounces each)
salt, freshly ground black pepper and cayenne to taste
1 tablespoon olive oil for searing
1/4 cup chicken broth for the pan

For the garlic breadcrumbs:
3 tablespoons unsalted butter
1/2 cup panko breadcrumbs
3 finely crushed or minced garlic cloves
1 tablespoon finely chopped Italian parsley
2 tablespoons grated Parmigiano-Reggiano

For the “glue:”
1 tablespoon mayo
1 teaspoon balsamic vinegar
1 1/2 teaspoon Dijon mustard

For the optional pan sauce:
1/3 cup chicken broth
juice from 1 lemon
1 teaspoon balsamic vinegar
salt and freshly ground black pepper to taste
-->

Friday, October 26, 2018

Pig in a Pumpkin – Trick and Treat

Okay, so we’re not using a whole pig, but we are using a whole pumpkin, which not only produced some very succulent, flavorful pork, but also made for an absolutely stunning presentation. This looked so good, that many people might think it was faked, which really is the ultimate compliment.

While this would work in any pumpkin, try to find ones sold as “sugar,” or “pie” pumpkins,” since they have a thicker, sweeter flesh, compared to the ornamental ones sold for jack-o'-lantering. I believe the variety I used was called “cannonball,” but simply look for round, heavy-feeling varieties about the size of a volleyball, displayed in the produce department, and not outside, or in front of the store.

As I said in the video, you can season this anyway you want, but regardless of what exactly goes in your gourd, make sure you roast it until the meat is tender. How long will depend on the size of course, so be sure to test the meat as it cooks. The only thing I’d do differently next time, would be to pour in a little more cider after a few hours in the oven, since a lot of it evaporated as it roasted, and I wanted more “sauce” when I was done.

After you remove the meat for service, ladle out all the braising liquid, and let it sit for a few minutes, so you can skim off most of the fat. Thanks to the little bit of flour on the pork, it should have a nice thickness, but you can always adjust that with some more roux. Or, simply make a sauce separately, and then just spike it with your drippings.

Also, if you wanted to add another step, you could use a blender to make a smoother sauce, but I’ll leave that up to you. Either way, if you’re looking for a fun, and very seasonably appropriate way to cook some pork shoulder, I couldn’t think of a better, or more beautiful way, which is why I really hope you give this a try soon. Enjoy!


Ingredients for one Pig in a Pumpkin:
1 volleyball-sized cooking pumpkin
3 1/2 to 4 pounds of boneless pork shoulder
1 rounded tablespoon kosher salt (the pumpkin will absorb some of this)
2 teaspoon freshly ground black pepper
1/4 teaspoon cayenne pepper
1/2 teaspoon dried thyme
1 teaspoon crushed fennel seeds
1 tablespoon freshly chopped rosemary
1/3 cup thinly sliced shallots
- garlic and sage would have also been great here
2 tablespoons flour to coat pork
1 tablespoon olive oil for browning meat
at least 2 cups hard cider, or more if you can fit it in before or during cooking

- I roasted mine at 350 F. for about 4 hours
-->